Monday, 1 February 2016

When messy play gets messy!

Oh dear...

Not everything I try goes well and this didn't go well at all...

I thought I would share this, as you can end up looking at lots of blogs with happy, smiling, well behaved kids and think, "What am I doing wrong?" You aren't doing anything wrong, people are only sharing the stuff that went well!

We go to a lovely toddler group once a week that always has a messy play station. One week, it was cold, cooked spaghetti. Little E loved it and I squirrelled it away as an idea that I could do easily at home. How messy can spaghetti get?

Really messy...


My rookie mistake? Forgetting Little E likes throwing. He threw it everywhere! I think we'll be finding spaghetti down the back of radiators for a week. When he started throwing it at me, I'd had enough and ended the game.

Picking cold, sticky spaghetti off the floor takes a long time.

This is why I have always been concerned about messy play. I have limited energy and I really didn't want to clean that all up on top of everything else I have to do. Worst of all, Little E didn't want to help the clean up and had a tantrum.

Sigh...Felt like a failure...

Then I reflected...

Until then, we'd had a really nice time.


He'd love it. Chopping, cutting, serving me bowls of spaghetti, sticking his hands and face in it! He cut it up with scissors and I showed him how to use scissors with one hand. It was great.

Yes, he had a tantrum, but I stood my ground and in the end, he came back and helped me tidy up. Yes! 1 point to mummy!

So...will I do spaghetti again? Maybe outside for the time being or until he is old enough to stop throwing things!

I'd definitely recommend having a go if you think you can contain the mess...or have a dog to eat it all up off the floor and walls and chairs and ceiling....

Friday, 22 January 2016

Toddler activity - ice world

I had all these high ideals of Little E not watching TV.

Guess how long that lasted...

I am so lucky to live in a world with CBeebies. High quality, fun and educational programmes on a dedicated channel from 6am until 7pm. At least I can be confident that when I turn the TV on there will be good stuff. He's learnt a lot.

The only problem...Little E LOVES TV. I think he'd watch it all day if he could. We had to bring in strict rules about turning off the TV. Cue tears and tantrums. It was hard. Now he'll turn off the TV, but looks at me as if to say, "Now what?" He'll play with his toys, but unless he is really interested, we can end up with him sitting on the sofa, shouting at me to turn the TV back on.

If the weather is good, no problem. He'll happily play outside for ages. But on bad weather days, the afternoons can drag on with him demanding TV over and over unless I keep distracting him.

It helps if I have some ideas of ways to entertain Little E. Hence, one soggy day, I pulled out - Mini Ice World.


There are loads of ideas like this on Pinterest. People call them mini-worlds, sensory bins, etc. I'd seen an artic one and thought it looked so pretty, so had been collecting items - some left over polystyrene from Christmas, glass pebbles from a charity shop, Schleich polar animals and some hair mousse. I got out our baking tray and covered it in baking parchment to try to protect it.

Little E gasped when he saw it and was engrossed for about 45 minutes. Result!

I had frozen some ice cubes, which I added as well. Little E wasn't that bothered to be honest, but I've seen other ideas when you freeze all sorts of shapes to make ice floes for polar pears, etc, so I might try that in the future.

He loved the foaming hair mousse! An old memory dredged up from my past. I used to sneak into my mum's hair kit and spray tiny amounts of hair mousse on my hand. I loved to watch it puff up too.


He kept pointing to where he wanted me to squirt some next. I dropped some of the animals in the foam and said they were hiding. This amused him. When he found them, he wasn't happy that the foam had stuck to them. "Dirty!"

Guess, they need a bath then! Little E is a "water baby". He'll mess around with water until the cows come home. So, I got some out.


After their bath, he poured most of the water into the tray! We were all very soggy by the end, but it was good fun. The baking parchment did not survive!

Little E began making the penguin and seal swim through the water. He said they were eating. I asked him if he knew what they ate. At which point, I remembered we had more items we could use for our icy world! A duplo fish and polar bear. In they went.


It was amazing how much there was to talk about. The animals, the experience, the polystyrene floating, the glass beads sinking...We both enjoyed it.

When he was done, I tidied the animals, polystyrene, pebbles and mousse away into a shoe box and hope to bring them out another time.

If you fancy a go, there is lots of inspiration on Pinterest. However, lots of them are pretty complicated with lots of ingredients and things you need. I don't want to spend too much money and end up with more junk in my house, so I aimed to reuse and recycle. Always great to hear anyone else's ideas.

Time to experiment with some more mini worlds methinks!

Tuesday, 8 December 2015

Crafting by not a very crafty mum - finger print thank you cards

Christmas was coming, the goose was getting fat, so it was time to sort out Christmas thank you cards.

I was so pleased how fast and effective this one was. Check it out.


These are all our thumb prints. I've seen things with baby/toddler footprints, etc, but I thought it would be lovely to include the whole family this Christmas.

I bought a finger printing set which had brown paint and just added some red stickers as noses and drew in some details with a biro. If I'd had some black stickers, I would have done black for us parents and red for just Little E, but red was what I had in stock!

Again, I put this on a postcard that I printed out as many times as I needed, but if you have agreeable little ones you could make them all by hand. Not likely with our Little E! One good thing about making them as postcards was some of the borders that were available were lovely and I felt really added to the final outcome.


I think I've had the most positive feedback about this thank you card.

And yes...I have big thumbs...for keeping people under, y'know.

Friday, 23 October 2015

Crafting by not a very crafty mum - hair keepsake for grandparents' day

Little E has a glorious head of curly hair. When he had his first hair cut, I was planning to keep a curl, but in the end I kept a whole bagful! Enough to make a Little E toupee.

I put one curl in his baby book, but what to do with the rest?

One idea I had thought about and then brought out were these cards:


I was always a bit sniffy about "new holidays" such as Grandparents' Day, but now that I have a child, it is such a nice way to say thank you for all they do for us.

"Ingredients"
Card
Sticky back plastic
Photos
Glue stick
Sellotape
Pen

Step 1
Cut out two square of sticky back plastic big enough to fit your lock of hair. Trap the hair between them.


Step 2
Fold your card and cut out a shape on the front. I went for a heart and used a template to help me draw it. Make sure it is big enough to show off you lock of hair.


Step 3
Sellotape your sealed lock of hair to the back.


Step 4
Decorate the front of your card as you wish. I went for a photo of Little E with his grandparents. I used a silver pen to write Happy Grandparents' Day, but it didn't come out that well. I think gold would have been better, but I don't have gold!


Ta dah!

Both sets of grandparents were very touched and it is an easy way for them to keep a lock of his hair for future reference.

Sunday, 27 September 2015

Cake decorating - diggers!

We all have those memories of that kid whose mum always pulled out some amazing home made cake - a pirate ship, a train, a working nuclear power plant...

I'm not that mum!

However, a friend of mine gave me some brilliant advice.

"Buy a chocolate cake and stick their favourite toy on top. They will love it!"

Works for me!


As you may have guessed, Little E likes diggers. I'd collected some ideas online of digger cakes. There are some awesome ones out there, but we were returning from a family wedding and staying at my in-laws house for Little E's birthday party, so I had limited time, equipment and (frankly) energy.

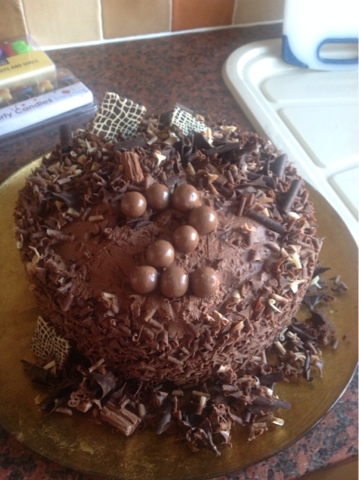
I'd eaten this cake from Sainsbury's at a work leaving do. It is a huge, triple layer chocolate cake. At the time, I thought it could work well as a building site with all the chocolate "rubble".


I stood and thought a bit about my options. I wanted to decorate the number 2 on top. I had wondered about having all the diggers arranged in a big 2, but they were too big, using brownies (too big), etc. The Malteasers I had bought were much more flexible to make a number out of, so I cleared a patch...


Then add diggers!

These are from a pack by Le Toy Van. I was so pleased when I got them out of the pack. They have great movements and feel nice.

All the chocolate flakes removed from the top could then be used as rubble.


There were 3 other diggers, but they were bigger than I expected and I decided less was more. However, my cousin-in-law had found some cute builder candles for me to add.


And with the rest of their crew...


Little E clocked the diggers immediately and (after we cut the cake) played with them all afternoon. They were definitely a hit!


It was such a simple thing to do and made everyone so happy, especially the people who ate the rest of my bag of Malteasers!


Friday, 18 September 2015

Crafting by not a very crafty mum - high five card

Our Little E loves a high five and when I saw this idea, it had to be done!


This was for Big E's birthday. Little E is beginning to like drawing a bit more now, but drawing around his hands is still the easiest way to get some crafting done.

"Ingredients"
Coloured card - purple is Big E's favourite, so I then chose a contrasting yellow
Glue
Pen
Paint and a sponge to paint with

Step 1

Draw around your little one's hands


Step 2

Cut out the hands. Be careful and keep the "stencil" for later. Fold your other piece of card in half.


Step 3

Cut out two thin strips of card and fold into concertinas. Stick these to your card and then onto your hands and they will pop out.


Step 4

I hadn't really thought about what to do with the front of the card, but there's a really nice UK show for children called Mister Maker. In one episode he used stencils and just painted around the edge to make a "cave painting". It looked pretty cool, so I thought I'd have a go. 


I really liked the effect and so did Big E. He wasn't expecting the surprise inside!

Step 5

I wrote my message on the front.


It is sitting proudly on the mantelpiece and hasn't fallen apart yet, so for the win!

Wednesday, 9 September 2015

Big Bang Cake

Big E's birthday! I've got into the habit of decorating a cake in the style of what programmes we are enjoying at the time.

So I've done Breaking Bad and Game of Thrones. Time for...The Big Bang Theory!


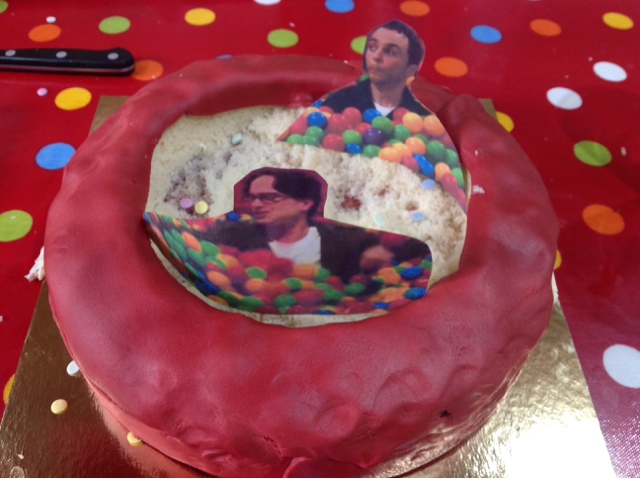
If you are a fan of the show, you'll remember there is an episode where Sheldon drinks coffee and ends up hiding in a ball pit from his friend Leonard. It's very funny. This was trying to replicate that. I got the idea via Pinterest, as per usual.

It didn't turn out as well as I had hoped, but Big E appreciated it, Little E tried to eat all the M&Ms and our friends who love the show had a laugh.

I really cut corners this year, so I'm sure it could have turned out better. Here's what I did.

I was worried there wouldn't be time to bake a cake, so I bought one.


Then I cut out the ball pit. The cake had layers, so this was pretty easy to do. I used a plate to make a nice neat circle.


What did I do with the leftover cake I cut out, you ask?

Er....well...some of it might have gone in my mouth. Just to test of course...

Then I rolled out ready made red icing. I am useless at icing, so it's a bit of mess. It didn't help that there wasn't quite enough.


I cut out images of Sheldon and Leonard and stuck them on cocktails sticks, so I could push them into the cake.


I then added the balls to my ball pits. I used M&Ms, because I like them and they are nice and colourful, but you could use anything you fancy.


I had found edible gold glitter spray and fancied giving it a go. I thought I could use a stencil to write out Bazinga, etc. I should have taken more care, as you can see ther letters all smudged. I was going to use black and yellow icing originally, but was intrigued by the glitter. I think it would have looked much better with the icing.


It tasted yummy! We all enjoyed the M&Ms with our cake. I shouldn't feel so despondent about the result. Not everything will turn out as well as I'd hoped! That's the point...to learn new things. It will be better next time.

We are watching Person of Interest at the moment. Not sure how to make that into a cake...